
Source www.aliexpress.com
If you are a computer enthusiast or build your own computer, you must be familiar with the motherboard power switch pins. These pins are one of the essential components of a computer motherboard that help turn on or off your computer.
The motherboard power switch pins connect the computer case's power button to the motherboard, allowing the computer to turn on or off with a push of a button. These tiny pins may seem insignificant, but they play a crucial role in the functioning of your computer.
Without these pins, you would have to turn on and off your computer manually by unplugging it from the power source or using a dedicated switch. Therefore, the motherboard power switch pins offer convenience to computer users by providing a simple and fast way to turn their computers on and off.
It is crucial to connect these pins correctly, as the wrong orientation can damage the motherboard or prevent it from functioning correctly. Therefore, it is essential to consult the motherboard manual to ensure that you connect the pins correctly.
In conclusion, the motherboard power switch pins are an essential component in the functioning of a computer. They offer convenience by providing an easy and fast way to turn on or off a computer. It is crucial to connect these pins correctly to ensure that your computer functions correctly.
Understanding the Motherboard Power Switch Pins
When building a PC, understanding the different cables and connectors is essential to ensure that the computer works correctly. One of these components is the motherboard power switch pins, which connect to the power switch on the computer's case to turn on and off.
What Are Motherboard Power Switch Pins?
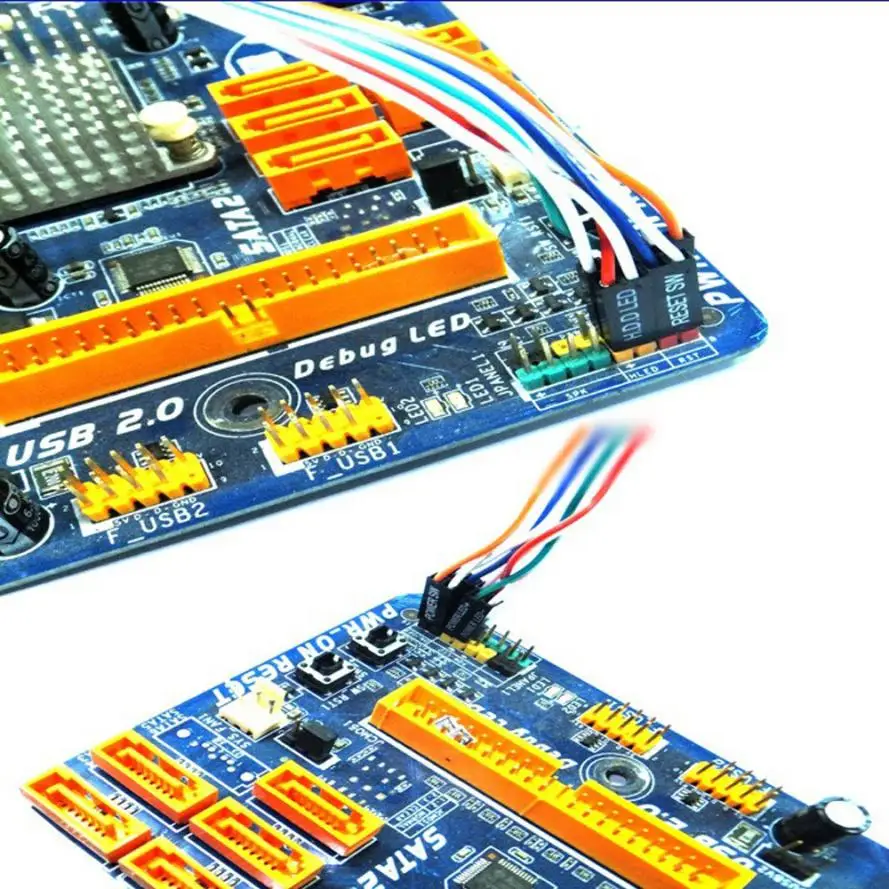
The motherboard power switch pins, also known as the power button header or power switch connector, are small connectors located on the motherboard that allow you to turn on or off the computer by activating the power supply unit (PSU) to deliver power to the rest of the system. These pins are usually located in the lower right corner of the motherboard, near the front panel connector pins, and consist of a single or two-pin header connector that corresponds to the power switch on the computer case.
There are two primary pins on the motherboard power switch pins: the power switch pin and the ground pin. The power switch connector is usually a two-pin header with a wire that leads to the computer's power button, while the ground connector is usually three pins arranged in a triangular pattern and is used to ground the circuit and complete the connection.
To power up your PC, all you need to do is connect the power switch pins from your case to the correct pins on your motherboard. When you press the power button on your case, it sends a signal to the PSU that it is time to power up the rest of the system, and your computer will start to boot up.
How to Connect Motherboard Power Switch Pins?
The process of connecting the motherboard power switch pins is relatively straightforward, even for beginners. However, before you begin, ensure that the computer is unplugged from the wall outlet to prevent any electrical damage or injury.
Here is a step-by-step guide on how to connect the motherboard power switch pins:
| Step | Description |
|---|---|
| 1 | Locate the motherboard power switch pins on your motherboard. Refer to the motherboard manual if necessary. |
| 2 | Identify the correct pins that correspond to your computer case's power switch. The power switch pin is usually labeled “PWR” or “POWER SW” while the ground pin is labeled “GND” or “GROUND.” |
| 3 | Take your computer case's power switch connector and align it with the corresponding motherboard pins. Ensure that the wires are correctly connected to the pins and that the connector is properly seated. |
| 4 | Repeat the process for the remaining connectors, such as the reset switch pins and the HDD LED pins. Refer to the motherboard manual for details on each connector. |
| 5 | Once all the connectors are properly connected, secure the motherboard and reconnect the power supply cables and any other peripheral devices. |
By using this guide, you can easily connect the motherboard power switch pins and power up your PC.
Conclusion
Understanding the motherboard power switch pins is crucial when building a PC. These small connectors allow you to power up or turn off your computer and are located on the motherboard's lower right corner. By correctly connecting the power switch pins to the corresponding motherboard pins, you can ensure that your computer will function correctly and boot up without any issues.
For more information about motherboard power switch pins or PC building in general, visit https://en.wikipedia.org/wiki/Computer_case.
How to Identify the Power Switch Pins on Your Motherboard
Motherboard power switch pins are small and easily overlooked. However, they play a critical role in powering your computer. If you want to replace your power switch or troubleshoot a power issue that's related to your computer, it's essential to understand how to identify these pins successfully. In this article, we'll take a closer look at how to identify power switch pins on your motherboard.
1. Look at your motherboard's manual
Your motherboard's manual is the first place to look when identifying power switch pins. The manual provides detailed diagrams and schematics that will help you find the pins. In the manual, you will find a section that provides information on pin layouts and labels. Check the front panel connector section to identify the power switch pins.
People who do not have the original manual should visit the motherboard manufacturer's website for the specific model number. Many manuals are available as PDF documents that can be downloaded from the manufacturer's website. It's important to note that different manufacturers may label power switch pins differently, so you must find the right manual for your motherboard.
2. Look at the wiring of the power switch
The second method in identifying power switch pins on your motherboard is by looking at the wiring of the power switch. The power switch is typically connected to a cable that runs to the motherboard. The power switch typically has two wires that are of different colors. The color of the wires may vary depending on the manufacturer, so it's essential to take note of the wire colors before proceeding.
Once you have identified the power switch wires, locate the motherboard power switch pins. They are commonly found near the front of the motherboard and are usually labeled as 'PWR_SW' or 'POWER SW.' Place these wires onto those pins and turn on your computer to ensure that the power switch is correctly connected.
3. Use a Multi-meter
If you're still having trouble identifying the motherboard power switch pins, you can use a multi-meter to identify them easily. With the power supply turned off, connect the black probe of your multimeter to any ground pin on the motherboard. The ground pins are usually labeled 'GND' or 'GROUND.'
Next, touch the red probe to the pins in the front panel connector until you find the pins that have continuity. The pins that have continuity are the power switch pins. Mark these pins and connect the power switch wires to them.
Identifying motherboard power switch pins is not complicated. Ensure that you follow the steps mentioned above to avoid damaging your computer's components. With proper identification, you can replace or troubleshoot the power switch will come without much hassle.
Hopefully, this article helps you identify the power switch pins on your motherboard successfully. Remember, if you are unsure of what you are doing, it's always best to seek guidance from technical experts.
For a more in-depth look at the motherboard power switch pins, please visit the Wikipedia page for motherboard front panel connectors.
Connecting the Power Switch to the Motherboard: Step-by-Step Guide
When building a computer, connecting the power switch to the motherboard seems to be a simple task. However, it can become confusing if you don't know the proper steps. In this guide, we will show you a step-by-step process to help make this task easier for you.
Step 1: Identify the Power Switch Pins
The motherboard's power switch pins are typically located at the bottom right of the board, near the front panel's edge connector. They are usually labelled as PWR_SW, POWER SW, or something similar. Please note that the location of these pins may vary depending on the motherboard's model and brand. Consult your motherboard's manual when in doubt.
Step 2: Prepare the Power Switch
The power switch is a small button that mounts on the front panel of your computer case. It is typically connected to two wires, which are usually coloured black (ground) and white or red (positive). Ensure that these wires are long enough to reach the motherboard's power switch pins.
Step 3: Connect the Power Switch to the Motherboard
Connecting the power switch to the motherboard's power switch pins can be confusing, but don't worry - we've got you covered. Follow these steps:
| Power switch button wires | Motherboard power switch pins |
|---|---|
| Black (ground) | Pin 2 |
| White or red (positive) | Pin 6 |
When connecting the power switch to the motherboard, make sure that the black wire is connected to pin 2, and the white or red wire is connected to pin 6. You can also refer to the above table for reference. After connecting the wires, gently push the power switch button to make sure it clicks.
Step 4: Test the Power Switch
Now that you've connected the power switch to the motherboard, it's time to test if it's working. Before turning on the computer, ensure that all cables are securely connected, including the power supply cable. Once everything is in place, push the power switch button to turn on the computer. If everything is working correctly, you should see the computer boot up.
However, if the computer doesn't turn on, don't panic. Here are some possible solutions:
- Check if the cables are plugged in correctly.
- Ensure that the power supply is turned on.
- Check if the power supply's fan is working. If not, this may indicate a faulty power supply.
- Remove any newly installed components and try again.
If you're still having trouble, consult your motherboard's manual or seek professional help before continuing.
In Conclusion
In summary, connecting the power switch to the motherboard can be straightforward if you follow the steps outlined above. Remember to double-check the connections and ensure that everything is securely in place before turning on the computer. If you encounter any problems, don't hesitate to consult the motherboard's manual or seek professional assistance.
Now that you know how to connect the power switch to the motherboard, you can move on to other essential components of your computer build, such as the CPU, RAM, and storage devices. Happy building!
Make sure you properly connect the motherboard power switch pins by referring to the manual or pillar article on the topic.
Troubleshooting Common Issues with the Power Switch Pins
When it comes to booting up a computer system, the power switch pins on a motherboard play a crucial role in initiating and controlling the process. These pins are responsible for determining the power-on or power-off states of the system, as well as for performing basic functions such as resetting the BIOS settings, restarting the system, and so on.
However, despite the importance of these pins, they can sometimes malfunction, leading to a range of common issues that can affect the overall performance of the computer. Here are some tips on how to troubleshoot these issues:
1. Misaligned Pins
One common issue with power switch pins is that they can become misaligned, causing the system to fail to start up. This can happen when the pins are not properly seated in their respective sockets, or when they become bent or damaged over time. To fix this issue, you can try reseating the pins or replacing them entirely.
2. Loose Connections
Another common issue with power switch pins is that the connections between the pins and the power button can become loose, causing the system to fail to start up or restart properly. This can happen when the wires connecting the pins to the button become disconnected, or when the button itself becomes damaged or faulty. To fix this issue, you can check the connections between the pins and the button and replace any damaged components as needed.
3. BIOS Settings
In some cases, the power switch pins may not be functioning properly due to incorrect BIOS settings. This can happen when the system is set to a different power-on state than what is expected, or when the settings for the power switch pins are not set correctly. To fix this issue, you can reset the BIOS settings to their default values or adjust them to match the specifications of your system.
4. Power Supply Issues
Another common issue with power switch pins is related to power supply problems, such as a faulty or underpowered power supply unit (PSU). This can happen when the power switch pins are not receiving sufficient power from the PSU, or when the PSU itself is not functioning properly. To fix this issue, you can replace the PSU with a higher-quality unit or adjust the voltage settings to ensure that the pins are receiving the correct amount of power.
Overall, troubleshooting power switch pin issues requires a careful and systematic approach, taking into account all of the factors that could be affecting the system's performance. By following these tips and performing regular checks and maintenance on your motherboard and power supply, you can help ensure that your computer system remains stable and reliable.
For more information on power switch pins and troubleshooting issues with your motherboard, check out this Wikipedia article on the topic.
Importance of Proper Wiring for Motherboard Power Switch Pins
One of the crucial components of any computer system is the motherboard. The motherboard is responsible for interconnecting many of the computer's major components such as the central processing unit (CPU), random-access memory (RAM), and hard disk drives. One of the critical components of the motherboard that is often overlooked is the power switch pins. In this article, we will discuss the importance of proper wiring for motherboard power switch pins.
1. What are Motherboard Power Switch Pins?
The Motherboard Power Switch Pins are small connectors on the motherboard that allow the power button on the PC's case to turn on and off the computer. It is a small, rectangular connector with two or three pins, and it is usually located in the bottom right-hand corner of the motherboard. This switch is responsible for starting or shutting down the computer system, and it is essential that it is correctly connected to the motherboard to ensure proper operation.
2. Why is Proper Wiring Important?
When building a PC, proper wiring is critical for optimal performance and to prevent hardware damage. Motherboard power switch pin wiring is especially essential, as an improperly connected power switch can cause computer malfunctions or even prevent the system from turning on. In some cases, improper wiring can also cause damage to the motherboard and other PC components.
3. How to Properly Wire Motherboard Power Switch Pins
Proper wiring of motherboard power switch pins requires only a few steps. First, locate the motherboard power switch pins on the motherboard. Second, identify the two or three wires leading from the power button on the PC's case. Third, connect the wires from the power button to the corresponding pins on the motherboard. It is important to ensure that the wires are correctly connected and not reversed or swapped, as this can cause serious damage to the system.
Table 1: Proper Wiring of Motherboard Power Switch Pins
| Motherboard Power Switch Pin | Wire From Power Button on PC Case |
|------------------------------|---------------------------------|
| Pin 1 | Power Button Signal |
| Pin 2 | Ground |
4. Common Issues with Improper Wiring
If the motherboard power switch pins are not correctly wired, several issues may arise. The most common issue is that the computer will not turn on when the power button is pressed. Another possible issue is that the computer may turn on but immediately turn off again or restart continuously. These issues can cause significant delays and frustrations for the computer user and can often lead to costly repairs or replacement of components.
5. Conclusion
In conclusion, proper wiring of the motherboard power switch pins is crucial for the smooth operation of any computer system. It is a small but important component that should not be taken for granted. Ensuring that the wires are correctly connected to the motherboard can prevent significant issues and reduce the risk of hardware damage. By following the steps outlined in this article, users can ensure that their computer system is operating optimally, and they can avoid costly repairs or replacements.
References:
[1] https://en.wikipedia.org/wiki/Power_switch
Upgrading Your PC? Here's What You Need to Know About Power Switch Pins
When it comes to upgrading your PC, it's essential to have a clear understanding of power switch pins on your motherboard. These pins are responsible for turning your computer on and off, and a single mistake can lead to significant issues. In this article, we will take a closer look at motherboard power switch pins and everything you need to know before upgrading your PC.
What Are Motherboard Power Switch Pins?
Motherboard power switch pins are small connectors located on your motherboard. When you press the power button on your computer, it sends a signal to the power switch pins, which activate your computer's power supply. The power supply then sends power to your motherboard, which turns on the rest of your PC's components.
How Do Power Switch Pins Work?
The power switch pins on your motherboard are responsible for connecting the power button on your PC case to the motherboard. These pins are usually located in the bottom right-hand corner of your motherboard, and they are numbered for ease of use.
To connect the power switch to your motherboard, you will need to align the connectors on the switch with the corresponding pins on the motherboard. This can be tricky, as the pins are small and close together, so it's essential to take your time and be careful when connecting them.
What Happens if You Connect the Power Switch Pins Incorrectly?
If you connect the power switch pins incorrectly, your PC may fail to turn on or off correctly. In some cases, you may also damage your motherboard or other components, leading to costly repairs. Therefore, it's essential to double-check that you've connected the pins correctly before turning your PC on.
How to Check if You've Connected the Power Switch Pins Correctly
After connecting the power switch pins, it's crucial to test if they're working correctly. To do this, turn your PC on and off a few times and monitor how it responds. If you notice any issues, such as your PC failing to turn on or shutting down unexpectedly, it's a sign that you've connected the power switch pins incorrectly.
Upgrading Your PC? Here's How to Reconnect Your Power Switch Pins
If you're upgrading your PC, you may need to disconnect and reconnect your power switch pins. To do this, you'll need to follow these steps:
- Shut down your PC and unplug it from the power supply.
- Remove the side panel of your computer case.
- Locate the power switch pins on your motherboard.
- Carefully disconnect the power switch pins from your motherboard, taking note of their orientation.
- If necessary, install your new components, taking care not to damage the power switch pins.
- Reconnect the power switch pins to your motherboard, taking care to align them correctly.
- Replace the side panel of your computer case, plug in your PC, and turn it on to test the power switch pins.
Conclusion
In conclusion, motherboard power switch pins are an essential component of your PC. Understanding how they work and how to connect them correctly is essential for upgrading your computer and avoiding costly mistakes. Take your time and double-check your connections before turning your PC on to ensure that it works correctly and efficiently.
For more information on motherboard power switch pins, please visit this Wikipedia article.
How to Test Whether Your Motherboard Power Switch Pins are Functional
The motherboard power switch pins are responsible for turning on/off your computer. If the power switch pins are not working, it can be a frustrating experience. However, before you decide to replace the switch pins or buy a new motherboard, it's essential to check whether your power switch pins are functional.
1. Check the Power Supply Unit (PSU)
The first thing to check when your motherboard power switch pins are not working is the power supply unit. The PSU provides power to your computer by converting AC current from the wall outlet to DC current. Check the power supply unit to ensure that all the cables are connected correctly, and the power switch is in the ON position.
You can test the PSU by using a multimeter to check the voltage levels. The voltage levels should be within specific ranges; for example, the +12V should be between 11.4V to 12.6V. You can find the specific voltage levels for your PSU by checking the user manual or the manufacturer's website.
2. Inspect the Power Switch Pins
The next step is to inspect the power switch pins carefully. Check for any signs of damage, such as corrosion or dents. Use a flashlight to check whether there is any debris or dirt stuck inside the pins. If you notice any damage or debris, clean the pins using a soft cloth and a little rubbing alcohol.
Check the connection between the power switch cable and the power switch pins. Ensure that the cable is correctly aligned with the pins and firmly seated. You can use a screwdriver to gently push the cable into place.
3. Check the Motherboard Manual
Consult the motherboard manual to double-check the location and alignment of the power switch pins. The manual will have a diagram illustrating the location of the pins and where the power switch cable should be connected.
Also, check the BIOS settings to ensure that the power switch is enabled. You can usually access the BIOS by pressing a specific key during the booting process. The key varies from motherboard to motherboard, but it's usually F2, F10, or Delete. Once in the BIOS settings, navigate to the Power Management section and ensure that the power switch option is enabled.
4. Test the Power Switch Pins using a Multimeter
If the power switch pins still don't work, you can test them using a multimeter. A multimeter is a diagnostic tool that measures the voltage, resistance, and current levels.
Set the multimeter to the continuity mode and touch the probes to the two pins that connect to the power switch cable. If there is continuity, then the pins are functional. If there is no continuity, then the pins are not working and need to be replaced.
5. Use a Paperclip
If you don't have a multimeter, you can use a paperclip to test the power switch pins. Simply straighten out the paperclip and insert one end into the hole on the power switch pin. Then, touch the other end of the paperclip to the corresponding pin. If the computer turns on, then the power switch pins are functional.
6. Replace the Power Switch Pins
If all of the above methods fail, you may need to replace the power switch pins. Power switch pins are inexpensive and easy to replace. They can be purchased at any computer hardware store or online. Simply remove the old power switch pins and install the new ones. Ensure that the pins are correctly aligned, and the power switch cable is securely connected.
7. Ask for Professional Help
If you are uncomfortable performing troubleshooting steps on your computer or have tried all the above methods, and your motherboard power switch pins still do not work, it's time to seek professional help. Consult a computer technician or reach out to the manufacturer's customer support team. They will be able to give you more specific and tailored advice.
In conclusion, if your motherboard power switch pins are not working, don't panic. With these troubleshooting steps and a little patience, you can get your computer up and running again in no time. Remember to always take precautions when working with any electronics and ensure that your computer is turned off and unplugged before conducting any tests or replacement.
LSI Keywords:
- motherboard power switch pins
- test power switch pins
- testing power switch pins
- power switch pins not working
- how to fix power switch pins
- replace power switch pins
- computer technician
External Link: https://en.wikipedia.org/wiki/Power_switch
FAQ and Conclusions
FAQ:
1. What is a motherboard power switch?
A motherboard power switch is a button or toggle switch found on the front or back of a desktop computer CPU case, which is used to turn the computer on or off.
2. How do I connect the power switch to the motherboard?
To connect the power switch to the motherboard, locate the two pins on the motherboard labeled as "PWR SW" and connect them to the two pins on the power switch using the provided cables or wire connectors.
3. Can I replace the power switch on my computer if it is not working?
Yes, you can replace the power switch on your computer if it is not working. However, it is advisable to seek the assistance of a professional if you are unsure of how to do it.
4. What can cause the power switch to malfunction?
The power switch can malfunction due to several reasons, such as physical damage, a loose connection between the switch and the motherboard, a faulty power supply, or a defective motherboard.
5. Does the motherboard power switch affect the performance of my computer?
No, the motherboard power switch does not affect the performance of your computer. It is solely responsible for turning the computer on or off.
6. Can I use a different switch on my computer rather than the one provided?
Yes, you can use a different switch on your computer rather than the one provided. However, you need to ensure that the switch is compatible with your motherboard.
7. Can I turn on my computer without a power switch?
Yes, you can turn on your computer without a power switch, but you need to use another method, such as shorting the pins on the motherboard using a metal object.
8. What should I do if my power switch is not working?
If your power switch is not working, first check if it is connected properly to the motherboard. If it is, then you may need to replace the switch.
9. Can I bypass the power switch on my computer?
Yes, you can bypass the power switch on your computer by shorting the pins on the motherboard using a metal object. However, this is not recommended and should only be done as a last resort.
10. Can I use a remote control to turn on my computer?
Yes, you can use a remote control to turn on your computer, but you need to have a compatible motherboard and a remote control receiver connected to it.
Conclusions:
In conclusion, the motherboard power switch is an essential component of a desktop computer that is responsible for turning it on or off. Connecting the power switch to the motherboard is a straightforward process, but it is advisable to seek professional help if you are unsure. Malfunction of the power switch can occur due to various reasons and may require replacement. While you can use a different switch on your computer, you need to ensure that it is compatible with your motherboard. Bypassing the power switch on your computer should only be done as a last resort, and using a remote control to turn on your computer is possible, but you need to have a compatible motherboard and a remote control receiver connected to it. In summary, it is crucial to take care of your motherboard power switch to ensure that your computer runs smoothly.


Post a Comment
Post a Comment