
Source techreviewteam.com
Have you ever come across a situation where you turn on your computer, but nothing happens? All you see is a red light on your motherboard's CPU. Don't stress! This article will explain what that light means and why it's essential.
The motherboard CPU light appears when there is an issue with the computer's power supply or if the CPU is not functioning correctly. Typically, the light is red, indicating that there is a problem with the motherboard's central processing unit, commonly known as the CPU.
Knowing the significance of the motherboard and its related components is crucial for maintaining and troubleshooting your computer. The motherboard is responsible for linking all hardware components, allowing them to work together seamlessly. The CPU, which is the most crucial part of the motherboard, manages all of the data transmitted between hardware and software.
Understanding what the motherboard CPU light means can help you determine the problem and fix it accordingly. Whether it's a fault in the computer's power supply or a critical component failing, recognizing the issue can help you address it promptly and avoid further damage.
To sum up, the motherboard CPU light is an essential feature that can indicate any issues in your computer's hardware. Knowing the importance of the motherboard and related components can help you troubleshoot and maintain your computer, resulting in long-term benefits for your device.
Understanding the Motherboard CPU Light Red Error
When building a PC, one of the most important components that should be taken into consideration is the motherboard. It is the backbone of the computer system that connects all the other parts together. One of the most common issues that users may encounter while using a motherboard is a red light appearing on the CPU section of the board.
Reasons why Motherboard CPU Light Red Error occurs
Several reasons may lead to the appearance of a red light in the motherboard CPU section. The most common reason is due to CPU overheating. This occurs when the cooling system of the CPU fails to dissipate the heat generated properly. Once the temperature of the CPU exceeds a certain limit, the system automatically shuts down to protect it from damage.
Another reason is due to the misplacement of the CPU. It is crucial to ensure that the CPU is correctly installed on the motherboard. A misplaced CPU can result in an improper connection, leading to a red light on the motherboard CPU section.
Some motherboards may have faulty electrical connections, which may trigger the red light to appear on the CPU section of the board. In addition, incompatible or defective RAM modules can also lead to this issue.
How to Fix the Motherboard CPU Light Red Error
Several solutions can be used to fix the motherboard CPU light red error, depending on its cause. In the case of CPU overheating, the first solution is to check the cooling system of the CPU. Ensure that the heatsink fan and the thermal paste are appropriately installed and functioning correctly. If necessary, replace the fan or add more cooling fans to reduce the temperature of the CPU.
Verify that the CPU is correctly installed on the motherboard. Users should consult the motherboard's user manual to ensure that the CPU is correctly placed in the socket. A misplaced CPU can be gently removed, realigned and reinstalled. This may fix the problem and eliminate the red light on the CPU section.
If the red light persists, check for loose electrical connections, including the power supply connection to the motherboard. Loose connections can cause a power surge, leading to a red light in the CPU section. Users should check and ensure that all electrical connections are firmly and correctly connected.
Lastly, check the RAM modules. Remove and re-install the RAM modules properly. If a module is defective, replace it with a compatible module. It is essential to ensure that all components are compatible with the motherboard to avoid issues like a red light on the CPU section.
Conclusion
The motherboard is the central component of a computer system, and the CPU light red error can affect the system's proper functioning. Ensure that all components are installed correctly, and the cooling system is functioning correctly. Implement proper maintenance measures like cleaning the computer's interior and regularly checking for loose connections and faulty components.
Having a deeper understanding of the causes of a red light error in the motherboard CPU section and the solutions to fix them can help users maintain and resolve issues effectively. Consult the motherboard's user manual or consult with computer experts when it comes to technical issues that you may not be capable of handling.
External Link: Wikipedia: Motherboard
Possible Reasons for a Red CPU Light on the Motherboard
Motherboard CPU light red is a common issue that many computer users encounter. The motherboard CPU light usually indicates that there is an issue with the CPU or motherboard. In this article, we will discuss the possible reasons for the motherboard CPU light red issue.
1. Overheating
One of the most common reasons for a red CPU light on the motherboard is overheating. Overheating is caused by an inadequate cooling system or insufficient thermal paste. When the CPU reaches its maximum temperature, the motherboard will activate the CPU light to warn the user of potential damage to the processor. The first step in resolving the issue is to check the CPU temperature using third-party software like Core Temp or HWMonitor.
The following table outlines the possible reasons for overheating:
| Possible Reasons for Overheating | Solutions |
|---|---|
| Defective or dirty CPU fan | Clean the fan and replace if necessary |
| Incorrect CPU fan orientation | Reorient the CPU fan to maximize airflow |
| Inadequate thermal paste application | Clean and reapply thermal paste |
| Broken CPU fan or heatsink | Replace the fan or heatsink |
2. Faulty CPU or Motherboard
If the CPU is not experiencing any overheating issues, the next possible reason for a red CPU light on the motherboard is a faulty CPU or motherboard. A faulty CPU or motherboard can be caused by several factors, including manufacturing defects, damage due to electrical shorts or power surges, and aging hardware. To diagnose the issue, users can try testing their CPU and motherboard on a different system to determine if the issue persists. In most cases, a faulty CPU or motherboard will need to be replaced. However, it's worth noting that this can be an expensive solution.
3. Incorrect CPU Installation
Incorrect CPU installation is another possible reason for a red CPU light on the motherboard. An incorrectly installed CPU can damage the CPU socket or cause electrical shorts, which can lead to a red CPU light. When installing a CPU, it's essential to ensure that it is compatible with the motherboard and that the pins are aligned correctly. The following are some common mistakes to avoid when installing a CPU:
- Not properly aligning the CPU before pressing it down into the socket
- Forcing the CPU down onto the socket
- Not securing the CPU with the latch
Users can reference their motherboard manual or look up a guide online to learn how to install a CPU correctly.
4. Power Supply Issues
Finally, power supply issues can cause a red CPU light on the motherboard. If the power supply is not providing enough power to the CPU or if it is malfunctioning, it can cause a red CPU light. To diagnose the issue, users can try swapping out the power supply to see if the issue persists. It's worth noting that a faulty power supply can also cause issues with other hardware components in the computer.
In conclusion, the motherboard CPU light red issue can be caused by various factors, including overheating, faulty hardware, incorrect installation, and power supply issues. By properly diagnosing and resolving these issues, users can ensure that their CPU and motherboard remain in good working condition.
For more information, you can refer to Wikipedia's article on Central Processing Unit - Cause of failure.
Troubleshooting Steps to Fix a Red CPU Light on Motherboard
When building a computer, one of the most frustrating problems is the motherboard CPU light turning red. This usually means that there is a problem with the CPU, and the computer will not turn on. However, there are several steps you can take to troubleshoot and fix this issue before having to replace any hardware. In this article, we will discuss some troubleshooting steps to fix a red CPU light on the motherboard.
Step 1: Check the CPU
The first thing to do when encountering a red CPU light on the motherboard is to check the CPU. Make sure it is seated correctly in its socket on the motherboard. If it is not, gently remove the CPU and reinstall it. Ensure that the CPU pins are not bent or damaged. You can use a magnifying glass or a camera lens to check for any damage or bent pins. Also, check for any thermal paste residue left on the socket or CPU. Clean that up before trying again.
Step 2: Reset the BIOS
The BIOS (Basic Input/Output System) is a chip on the motherboard that controls the computer's startup process. If the CPU is not communicating with the BIOS, it can cause the red CPU light to turn on. To reset the BIOS, power off the computer and remove the CMOS battery for several minutes. The CMOS battery is typically a small button cell battery located on the motherboard. After several minutes, reinstall the battery and power on the computer. This will reset the BIOS to its default settings.
Step 3: Remove and Reinstall RAM
If the CPU and BIOS are not the problem, then it could be an issue with the RAM modules. The RAM (Random Access Memory) is where the computer stores data that is currently being used. If there is a problem with the RAM, it can cause the red CPU light to turn on. To troubleshoot this issue, remove all the RAM modules from their slots and reinstall them. Make sure they are seated correctly and that they are in the correct slots. If they are in the wrong slots it can cause the red cpu light to turn on. Refer to your motherboard manual for detailed instructions on the correct way to install RAM modules.
If the computer still does not turn on after trying the above troubleshooting methods, then it may be time to consider replacing the motherboard. A red CPU light on the motherboard can indicate a serious problem, but there are several steps that can be taken to troubleshoot and fix this issue.
In conclusion, the motherboard CPU light turning red can be a daunting issue to troubleshoot. However, before panicking, go through the above-mentioned steps and fix the issue if necessary. More importantly, don't forget to seek help from an expert or professional if the problem is not fixed using the above troubleshooting steps.
If you're experiencing a motherboard CPU light red issue, you may want to check the meaning of the red light on your motherboard to determine the cause of the problem.
Overcoming Overheating Issues through BIOS Update
One common issue that many computer users face is the motherboard CPU light turning red. In most cases, this indicates that the system is overheating, which can damage the motherboard and other components if left unchecked. Fortunately, there are several steps that users can take to address overheating issues, including updating the BIOS.
Firstly, it is important to understand what the BIOS is and how it can impact overheating. The BIOS (Basic Input/Output System) is a program that runs on the motherboard and manages the interaction between the hardware components and the operating system. Many modern BIOS versions come with thermal management features designed to monitor CPU and system temperatures, adjust fan speeds, and prevent overheating.
To update the BIOS and utilize these thermal management features, users should check their motherboard manufacturer's website and download the latest BIOS version. Before proceeding, users should ensure that they have a stable internet connection and a fully charged laptop or desktop computer. It is also important to read the instructions provided by the manufacturer and follow them carefully to avoid bricking the motherboard.
Once users have downloaded the BIOS update file, they should create a bootable USB drive and copy the file onto it. They should then restart their computer and enter the BIOS settings by pressing a designated key (such as F2 or Del) during the boot process. From there, users should navigate to the "Update BIOS" section, select the USB drive, and follow the on-screen instructions to update the BIOS.
It is worth noting that updating the BIOS can be a complex process, and users should only attempt it if they are comfortable with troubleshooting and technical procedures. If a user is unsure about performing a BIOS update, they should consult a professional technician or seek assistance from their motherboard manufacturer's support team.
In addition to updating the BIOS, there are several other steps that users can take to prevent overheating and ensure optimal system performance. These include:
- Cleaning the internal components: Over time, dust and debris can accumulate on the heatsink, fan, and other internal components, hindering their ability to dissipate heat and increasing overall system temperatures. Users should periodically clean these components with a soft brush or compressed air to keep them free of debris.
- Applying thermal paste: Thermal paste is a compound that helps to transfer heat between the CPU and heatsink more efficiently. Users can apply thermal paste to the CPU before reattaching the heatsink to improve thermal conductivity and reduce temperatures.
- Adjusting fan speeds: Many motherboard BIOS versions allow users to adjust the fan speeds manually, which can help to cool the system more effectively. Users can access the fan settings in the BIOS and adjust them to a higher speed to improve cooling.
In conclusion, the motherboard CPU light turning red is a common sign of overheating in computer systems. Upgrading the BIOS can help to prevent overheating and improve thermal management, but users should exercise caution and follow manufacturer instructions carefully. Additionally, users should take proactive measures such as cleaning internal components, applying thermal paste, and adjusting fan speeds to maintain optimal system temperatures and performance.
External link: https://en.wikipedia.org/wiki/BIOS
Checking for Hardware Compatibility with the Motherboard
Computer hardware is an integral part of every computer system. A motherboard is a critical component that connects different hardware peripherals together, including the CPU, memory, and other components. If the motherboard CPU light turns red, it signifies a problem that needs to be addressed immediately. Here are several steps to check for hardware compatibility with the motherboard:
1. Check for CPU Compatibility
The CPU (Central Processing Unit) is the heart of your computer that handles all the processing tasks. Before buying a new CPU, make sure to check if it’s compatible with the motherboard. First, check the CPU socket type and make sure your CPU matches your motherboard's socket type. If they don't match, your computer won't turn on. You can check the CPU compatibility chart on the motherboard manufacturer's website or the CPU manufacturer's website to ensure compatibility.
2. Check RAM Compatibility
RAM (Random Access Memory) is another critical component that affects your computer's performance. Ensure that you are using the right RAM type, frequency, and capacity that your motherboard supports. Motherboards have different memory types and frequencies, such as DDR3, DDR4, and others. Check your motherboard manual and RAM specifications to make sure they match.
3. Check Power Supply Compatibility
A power supply is an essential hardware component that provides power to all parts of your computer. Always ensure that you use a compatible power supply that can handle the power required by your motherboard and other hardware components. Check the motherboard's power supply requirements and make sure that your power supply can deliver sufficient wattage.
4. Check Graphics Card Compatibility
The graphics card is responsible for rendering high-quality graphics and images. Ensure that you use a compatible graphics card that can be plugged into the PCIe (Peripheral Component Interconnect Express) slot of your motherboard. Check your motherboard manual for compatibility and the graphics card requirements to make sure they match.
5. Check Cooling System Compatibility
A cooling system is necessary to keep your computer's temperature at optimal levels. If you're using a separate cooling system, ensure that it's compatible with your motherboard and can be mounted correctly. Check the motherboard manual for compatible cooling systems, mounting instructions, and other requirements to avoid any compatibility issues.
In conclusion, before assembling a computer, it's critical to check for hardware compatibility with the motherboard. Failure to do so can lead to issues such as the motherboard CPU light turning red. By using compatible hardware, you can ensure optimal performance and avoid any hardware issues.
For more information on motherboards, please visit https://en.wikipedia.org/wiki/Motherboard.
Dealing with Faulty Power Supply Connection to Resolve the Red CPU Light Error
A red light on the CPU light means that there is something wrong with the motherboard CPU, indicating that the CPU is not receiving enough power from the power supply. The primary cause of this problem is a faulty power supply connection. In this article, we discuss how to deal with a faulty power supply connection in five different steps.
Step 1: Disconnect the Power Source
The first step is to disconnect the power source from the computer to avoid any electrical shock. To disconnect the power source, you need to switch off the power button or unplug the power cable. By doing this, you will protect yourself and your system from a sudden surge of power that can lead to further damage.
Step 2: Inspect the Power Supply Connectors
The next step is to inspect the power supply connectors carefully. Examine the power supply connectors that are directly connected to the motherboard CPU. Often, a loose connector can be the reason for the lack of power supply connection. Check the 24-pin main power connector, the 4-pin ATX 12V (or 8-pin EPS 12V) connector, and the 6-pin PCIe power connector, depending on your motherboard type. If you find any loose connection, push the connector down firmly to ensure that the connection is secure.
Step 3: Check for Bends or Cuts on the Power Supply Connectors
The next step is to check whether the power supply connectors have any bends or cuts in them. If you find any, it is advisable to replace them to avoid system damage. Bent or cut connectors can cause the system to short-circuit. If you are using a modular power supply, then ensure that the right cables are connected to the right ports.
Step 4: Check the Power Supply Voltage
The next step is to test the power supply voltage. To do this, you need to use a multimeter. The voltage should be within the acceptable range according to the power supply specifications. If the voltage is not within the acceptable range, then it is essential to replace the power supply to avoid any system damage.
Step 5: Reconnect the Power Source
The final step is to reconnect the power source and turn on the computer. After reconnection, switch on the power button to check whether the CPU light is still red. If the light turns green, it indicates that the problem has been solved. You can then start using your computer.
Step 6: Additional Notes
Here are the additional things that you should consider to avoid any further CPU light issues:
| Actions to Avoid | Actions to Take |
|---|---|
| Do not attempt to open the power supply unit while plugged in. | Always unplug the power supply before opening it. |
| Do not use third-party power supply units that are not approved by the motherboard manufacturer. | Always use an approved power supply unit. |
| Do not connect a power-hungry device without considering the power requirements. | Check the power requirements and ensure that it does not exceed the power supply capacity. |
| Do not purchase too many accessories that are not needed, as they can cause issues with the power supply unit. | Only purchase accessories that are necessary to avoid overloading the power supply. |
In conclusion, the red CPU light error is primarily due to a faulty power supply connection. By following the above steps, you can resolve this issue and prevent future damage to your system. Additionally, following the suggested additional notes can help you avoid similar issues in the future.
Common Causes of a Red CPU Light on Motherboard
When building and setting up a computer, a red CPU light on the motherboard can be a cause of concern. It can indicate a number of issues related to the Central Processing Unit (CPU) that will prevent the computer from functioning properly. Some of the common causes of a red CPU light on the motherboard include overheating, BIOS issues, incompatible hardware, insufficient power supply, or a faulty CPU. In this article, we will explore these causes in detail and help you troubleshoot your computer accordingly.
DIY Fixes for a Red CPU Light on Motherboard
If you encounter a red CPU light on your motherboard, you may want to take a few steps to rectify the problem before seeking professional help. The following DIY tips can help you troubleshoot the issue:
Check the motherboard manual
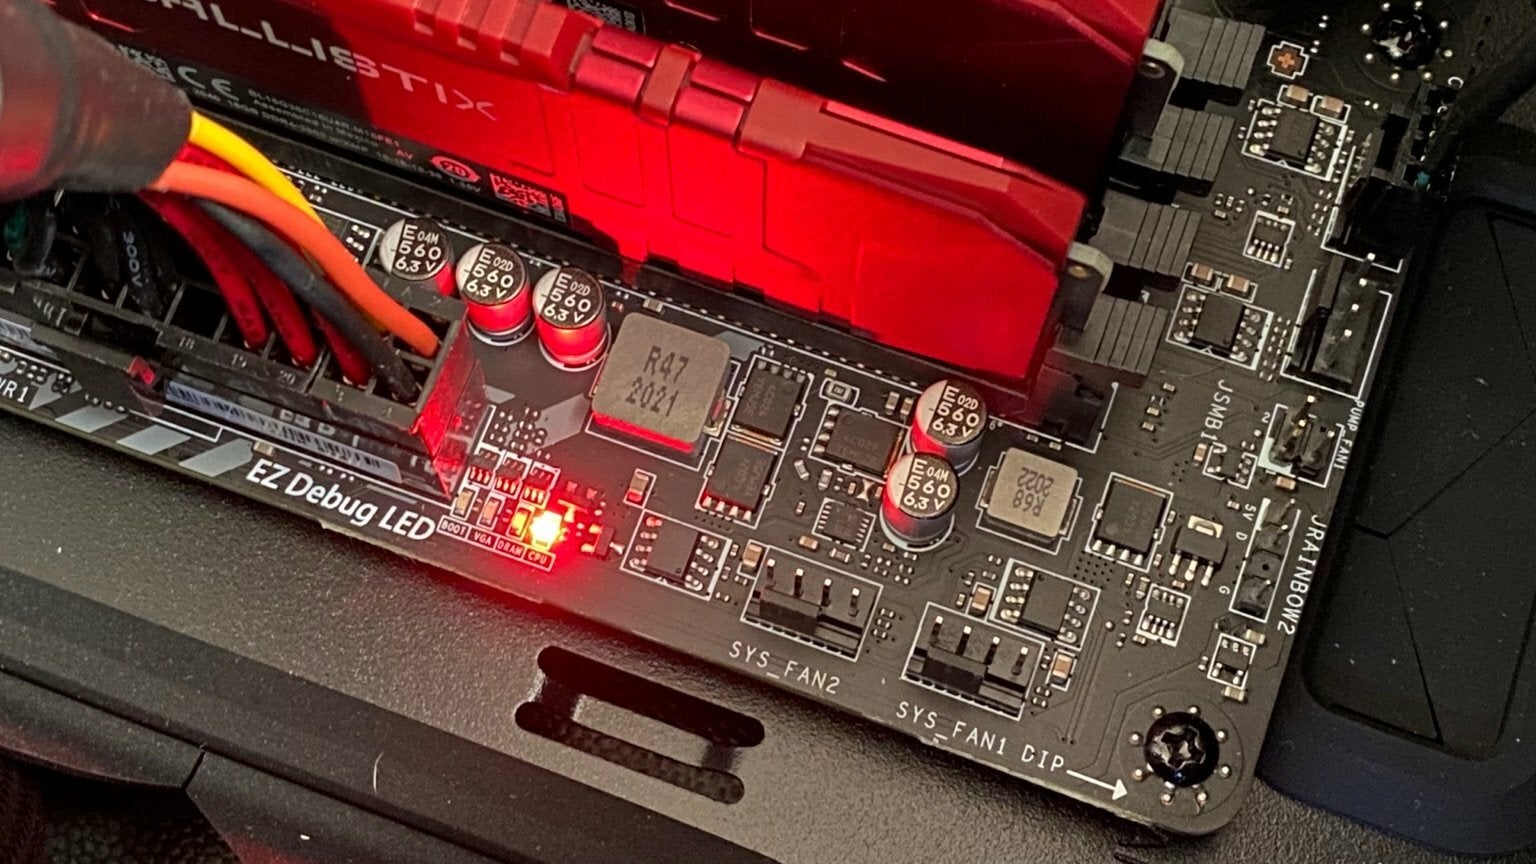
Your motherboard manual will have instructions on how to troubleshoot a red CPU light. Carefully review the manual to identify the specific steps to take to resolve the issue. Pay close attention to the LED indicators, which can help identify the part of the motherboard that is not functioning correctly.
Check the CPU fan and heatsink
The CPU fan and heatsink are crucial elements that help keep the CPU cool. If they are not working correctly or are clogged with dust, they can cause the CPU to overheat and shut down. Check and clean both the CPU fan and heatsink regularly to avoid overheating issues.
Update BIOS
Outdated BIOS versions can cause a red CPU light. Check the motherboard manufacturer's website for the latest updates. Before updating, ensure that you are using the correct BIOS version for your motherboard and follow the instructions carefully.
Unplug and plug back hardware components
Sometimes, an incompatible or loose hardware component can cause a red CPU light. Unplug all hardware components and plug them back in one at a time, ensuring that they are firmly seated in their sockets and compatible with the motherboard.
Check the power supply unit (PSU)
Insufficient power supply to the motherboard can cause a red CPU light. Check the PSU is correctly connected to the motherboard, and the connectors are snugly fitted. Ensure that your PSU meets the power requirements of your motherboard and other components.
Reseat the CPU
If all the above troubleshooting steps do not work, try reseating the CPU. Carefully remove the CPU from the motherboard and clean it thoroughly. Carefully reinsert the CPU and power up the system. If the issue persists, it's time to seek professional help.
Seeking Professional Help When DIY Fixes Fail
Sometimes, the solutions mentioned above do not work, or you are unsure how to resolve the issue. In such cases, it may be best to seek professional help. A professional computer technician can diagnose and repair any issue related to your CPU and motherboard. Here are some instances where it may be best to seek professional help:
Broken Hardware
If any hardware component is damaged, it is best to seek a professional. For instance, if the CPU is fried, then there is little that you can do with DIY fixes. A professional technician can help you identify the damaged component and advise you on a repair or replacement.
Warranty
If your computer or its components are still under warranty, seeking professional help is the best course of action. Trying to resolve the issue on your own may damage your components, ending the warranty cover. Additionally, some manufacturers may require a professional report before authorizing a warranty repair.
Technical Knowledge
If you lack technical knowledge or feel unsure about resolving the issue, seeking professional help is a wise decision. Professional computer technicians have the skills and expertise to diagnose and repair any issue, leaving you with a fully functional computer.
FAQ and Conclusions
FAQ Section
Q: Why is my motherboard CPU light red?
A: The red CPU LED light on your motherboard indicates that there is an issue with your CPU.
Q: Can a CPU failure cause a red light on the motherboard?
A: Yes, a CPU failure can cause a red light to appear on your motherboard.
Q: How can I fix a red CPU light on my motherboard?
A: You can try to remove and reseat your CPU, check for loose cables, or update your BIOS. If these options do not work, it may be a sign of CPU failure.
Q: Is a red light on my motherboard dangerous?
A: A red light on your motherboard signals an issue and should be addressed, but it is not necessarily dangerous.
Q: Can a power supply issue cause a red light on my motherboard?
A: Yes, a power supply issue can cause a red light to appear on your motherboard.
Q: What are common causes of a red CPU light on my motherboard?
A: The most common causes are CPU failure, power supply issues, loose cables, or a BIOS update.
Q: How can I prevent a red CPU light on my motherboard?
A: Regular maintenance and upgrades can help prevent issues with your CPU and power supply.
Q: Should I replace my CPU if the red light appears on my motherboard?
A: If the issue persists after attempting to fix it, it may be necessary to replace your CPU.
Q: Can a red light on my motherboard be fixed by resetting the CMOS?
A: Sometimes resetting the CMOS can fix issues with the red CPU light on your motherboard.
Q: Can a red light on my motherboard damage other components?
A: No, a red light on your motherboard should not cause damage to other components.
Conclusions
In conclusion, the red CPU light on your motherboard is a warning sign that something is wrong with your CPU. It could be due to CPU failure, power supply issues, or loose cables. While it may not be necessarily dangerous, it does require immediate attention. Regular maintenance and upgrades can help prevent problems with your CPU and power supply, but if the issue persists, it may be necessary to replace your CPU. Resetting the CMOS can sometimes fix the issue, but if it does not, it is best to seek professional help. Remember to always address any issues with your computer as soon as possible to prevent further damage.


Post a Comment
Post a Comment